
")


Free Funnel Audit
Convert more customers today!

SEO
10 mins read

SEO
10 mins read
Element testing inside CausalFunnel allows merchants to study how a single visual or interactive component influences store performance. Instead of redesigning an entire page, you adjust only one part of it and measure how shoppers react. This approach brings clarity because it isolates the exact reason behind an improvement or a drop.
The platform breaks the setup into four clear parts. Each stage controls a different layer of how the test behaves. To use element testing well, you need to understand the purpose behind every setting, not just the steps. This guide walks through the full logic so you know how to plan the experiment, where to use each option, and how every input shapes the final result.
The first screen asks for a name, a description, and a clear goal. These fields may look simple, but they shape the entire decision process.
A strong name forces clarity before you begin. Most stores run several tests at the same time or store several months of older results. If the test name communicates exactly what changed, your team will be able to interpret the data later without confusion.
A description is equally important. It captures the intention behind the experiment. This matters because two tests may use the same element but serve different objectives. For example, a button color test may aim for better clicks while a button placement test may focus on reducing hesitation.
The goal guides interpretation. If the goal states that the test is meant to improve interaction on a key button, you know the primary metric should align with that. If the goal states that the test is meant to reduce friction, then you will interpret bounce patterns differently.
This stage is not about typing fields. It is about setting direction.
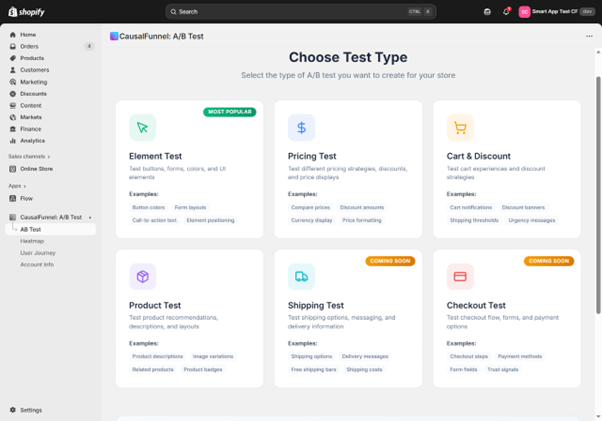
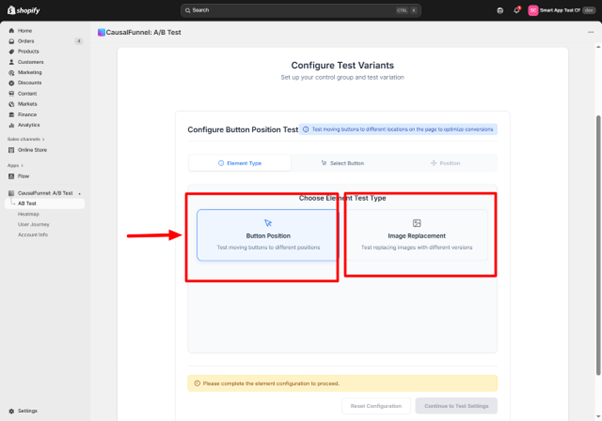
The next stage asks you to choose which type of element will be tested. Although the screen appears simple, your choice here decides the entire behavior of the experiment.
Selecting Button tells the system that the test revolves around a single action point. Buttons influence how shoppers respond to intentions such as adding to cart, buying now, or opening a menu.
Selecting Image Replacement shifts the experiment toward visual communication. Images influence emotional decisions, product understanding, and clarity.
The Position setting inside this stage decides the structural impact. A position change alters how the shopper encounters the element inside the flow of the page. An image replacement keeps the structure identical but studies how the eye responds to different visuals.
This part helps you choose between structural testing and content testing. That single distinction decides what kind of insights you will receive at the end.
CausalFunnel cannot run an experiment unless we or the system knows the exact element on your page. That is why the next stage asks for a selector, a name, and a page link.
The page link loads the correct environment so the preview can show you the actual element in real time. The selector links the experiment to that element so CausalFunnel can modify it during the test.
If the selector is wrong, even by a small detail, the variant may affect the wrong item or fail to apply changes. That is why the Find Selector tool is critical. It helps you pick the element visually instead of guessing code.
This stage is less about filling a field and more about targeting accuracy. The success of the experiment depends on this accuracy.
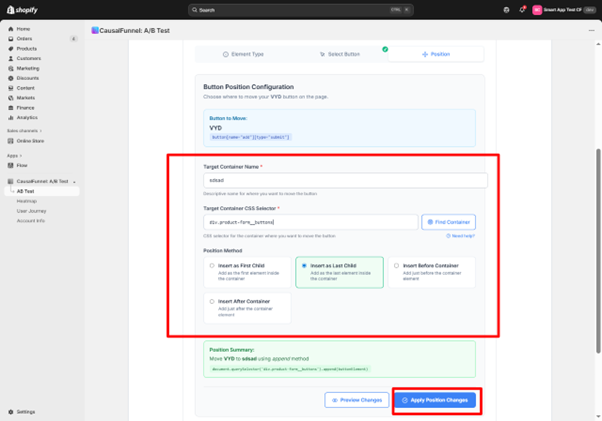
If the experiment involves button placement, you will be taken to a screen that controls where the button moves. This is one of the most powerful parts of element testing because small placement changes have a significant impact on user behavior.
The Position Method options decide how the button enters its new container. Insert as First Child places it at the beginning of the container. Insert as Last Child places it at the end. Insert Before and Insert After allow the button to move outside the container but remain adjacent to it.
These choices determine how the button sits within the content hierarchy. Movement within hierarchy influences visual scanning, hesitation, and clarity. You are not just selecting a placement. You are selecting how the shopper experiences the page.
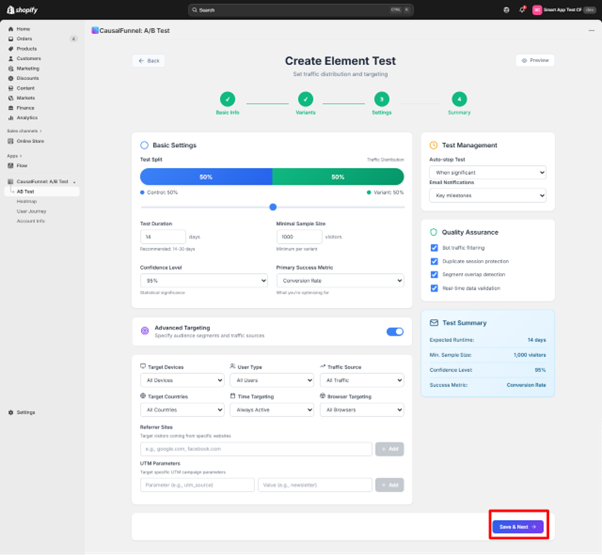
Next comes the section that controls the statistical behavior of the experiment. Every option here affects how trustworthy the final result will be.
A fifty fifty traffic split works because both versions receive equal exposure. If your store has extremely low traffic, you may adjust the split to collect faster data, but equal distribution is the safest choice for most tests.
Duration matters because shopper behavior varies across days of the week, types of traffic, and promotional periods. A typical range between fourteen and thirty days helps smooth out unusual spikes.
Minimal sample size protects the experiment from premature conclusions. The system waits until a certain number of visitors see each version before calculating probability.
Confidence level tells the system how certain it needs to be before selecting a winner. Ninety five percent is the industry standard for meaningful results.
The primary metric tells the system what to prioritize. If the goal was to increase clicks, then the metric should be the click related outcome.
These settings work together. One controls time. One controls a sample. One controls certainty. When combined, they protect your experiment from misleading results.
Advanced targeting allows you to run the experiment only for the visitors who matter to that specific question. This is important because not all changes are meant for all users.
For example, a button position test may behave very differently on mobile compared to desktop because of screen height. Testing both at once may dilute insights.
Traffic source targeting helps if you want to study behavior only for shoppers who arrive from advertising or email.
Country targeting matters when the design or the product has regional context.
Browser targeting protects you from surprises because certain browsers may load layouts differently.
You can even limit the test to a specific campaign by using UTM parameters. This helps when you want to study landing page behavior for a single marketing initiative.
Targeting turns broad testing into precise testing.
The summary screen condenses every decision into a single view. This is where you confirm whether the experiment aligns with the goal set in the beginning.
The page lists the projected number of visitors, the primary metric, the group structure, and every rule shaping traffic exposure. This helps you check for conflicts, such as targeting a country that does not generate enough traffic or choosing a container selector that may not exist across all products.
Preview buttons allow you to confirm that the visual change looks as expected. A test should never be launched without checking this preview because even small misplacements can alter the interpretation of results.
The summary ensures every part of the plan holds together as one complete experiment.
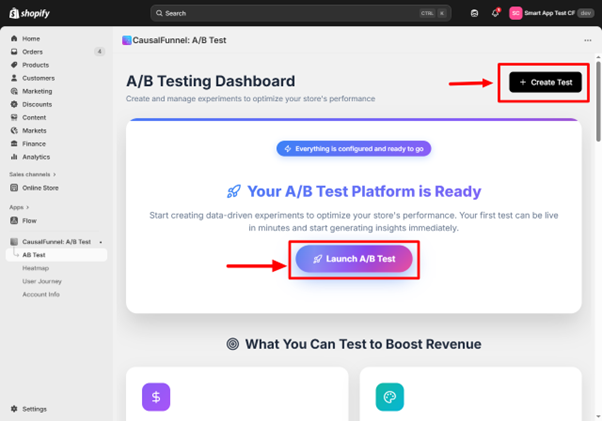
After launch, you are taken to the A B Testing Dashboard. This page becomes your operational center.
Every experiment appears with its purpose, its type, its current status, and the traffic distribution. This makes it easy to identify which tests are active, paused, or completed.
The dashboard helps you monitor patterns. If the variant starts outperforming control early, you can watch how the gap evolves. If the test is too slow, the dashboard helps you evaluate whether the targeting was too narrow.
This table becomes your testing history. Over time, it helps you recognize what type of element changes tend to influence your audience the most.
The setup begins with a page that asks for basic information. These fields help you stay organized when you run multiple tests over time.
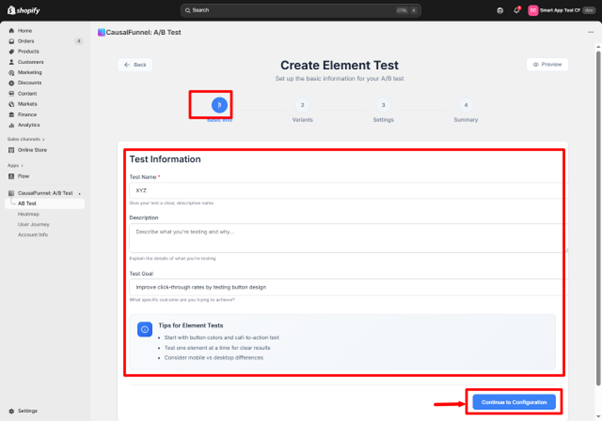
Choose a name that clearly states what is being changed. A direct title like Add to Cart Button Placement Test helps you recognize the test instantly on the dashboard.
Write a brief note that explains what you want to study. This line keeps everyone aligned, especially when several people create tests within the same account.
Describe the outcome you hope to improve. Element tests commonly aim to improve click rate, increase interaction on a key button, or reduce hesitation around a specific touchpoint.
The interface provides practical suggestions such as starting with color or text adjustments and testing one element at a time. It also reminds you that mobile and desktop users behave differently, so monitor both as results come in.
Press Continue to move forward.
This part of the flow shapes the experiment. You decide what type of element will be modified and how the change will be tested.
Select the element you want to edit. Button is the most common choice for performance tests.
Choose the kind of test required. The app currently supports two strong options.
Button Position
Use this when you want to place a button in a different location on the page.
Image Replacement
Use this when you want to compare two different images in the same spot.
If Image Replacement is selected, the flow mirrors the button setup but focuses on image fields instead of button fields.
The app checks for missing details and prompts you if anything important is skipped.
Press Continue to move to the next section.
This step is where you connect the test to a real element on your Shopify store.
If you are testing a button, you will see fields that help the app locate the exact element.
Give the button a descriptive label such as Buy Now Button or Product Page Add to Cart.
Paste the URL where the button appears. This allows the preview window to load the correct page.
This selector links the experiment to the precise button. You can enter it manually or use the Find Selector tool inside the preview. The tool captures the selector the moment you click the element on the screen.
Once all fields are complete, continue.
If the test involves replacing an image, the fields work the same way.
Provide a clear name such as Hero Banner or Product Thumbnail.
Paste the page link where this image appears.
Use the selector that targets the specific image. You may use Find Image to select it from the preview directly.
Continue once everything is filled in.
If your test studies button placement, this section determines where the button will move and how the change will be applied.
This divides traffic between control and variant. The common starting point is fifty fifty.
Choose how many days the test should run. Most element tests need between fourteen and thirty days, depending on store traffic.
Enter the number of visitors required for each group before results can be trusted. The default is one thousand.
This indicates how strong the statistical evidence must be before the app calls a winner. Ninety five percent is the standard benchmark.
Select the metric that defines success. Element tests often focus on click rate or conversion rate.
Targeting helps you run experiments only for the visitors who matter most to a specific question.
Choose all devices or limit the test to mobile or desktop only.
Run the test for all users or restrict it to new visitors or returning visitors.
Target the test for all traffic or just selected entry points such as email campaigns, direct traffic, or ads.
Choose every region or restrict to specific countries.
Run the test all day or limit it to chosen hours.
Allow all browsers or select specific ones.
Test visitors arriving from specific websites.
Use this when you want the experiment to run only for traffic from certain campaigns.
These settings help you control the experiment during and after launch.
Auto Stop
The app can stop the test automatically once statistical significance is reached.
Email Notifications
Receive updates when your test hits milestones.
Quality Assurance Tools
Use these tools to verify that everything is configured correctly before launch.
Click Save and continue.
The summary page displays every important detail of the test. Review each section carefully.
You will see:
You can preview both the original version and the variant to confirm that the setup matches your intent.
Press Launch Test when ready.
Once your test is live, the CausalFunnel A B Testing Dashboard becomes your home base. This dashboard lists every running experiment and gives you an instant overview.
You will see:
The table acts as your workspace. This is where you monitor performance, pause tests, stop tests, or review outcomes after completion.
Element testing in CausalFunnel gives Shopify stores a direct way to see how small on-page adjustments influence shopper decisions. When you test one element at a time and use the app’s visual setup, your store gains clear proof of what helps visitors continue toward checkout. This method also reduces the guesswork that usually slows down optimization work. The combination of heatmaps, user paths, and controlled variations helps you refine your store layout with measurable insight. Over time, each validated change builds a stronger shopping experience that guides more visitors to complete their purchase.
Multisite for SEO is managing search optimization across multiple connected websites. Each site shares strategy, authority, and content guidelines. It helps businesses scale while maintaining strong rankings.
Yes, even small businesses benefit if planning multiple websites. Coordinated strategy ensures sites support each other. Proper setup prevents wasted effort and improves search visibility.
Use centralized analytics to track traffic, engagement, and conversions. Compare metrics across sites to identify strengths and weaknesses. Regular reporting ensures informed SEO decisions.
Audit at least quarterly or whenever adding a new site. Check content, links, technical SEO, and analytics. Proactive auditing prevents performance drops and long-term issues.
Avoid over-fragmenting domains, poor internal linking, duplicate content, and siloed execution. Maintain consistent technical setup and coordinated analytics.
Yes, coordinated sites strengthen authority and visibility. This drives consistent traffic, higher engagement, and better quality leads. Long-term results are stronger than isolated single-site SEO.
Multisite SEO ensures multiple websites work together rather than compete. It improves authority, user experience, and search engine visibility. Long-term traffic and leads increase when sites are coordinated properly.
Subdirectories consolidate authority under one domain, usually helping rankings. Subdomains separate content but may divide authority. The choice depends on business goals and scalability needs.
Assign unique keyword themes to each site. Ensure content angles differ and link primary pages strategically. Regular audits detect duplication before it affects rankings.
Start using our A/B test platform now and unlock the hidden potential of your website traffic. Your success begins with giving users the personalized experiences they want.
Start Your Free Trial
Empowering businesses to optimize their conversion funnels with AI-driven insights and automation. Turn traffic into sales with our advanced attribution platform.
Trusted by Customers


©CausalFunnel Inc. All rights reserved.